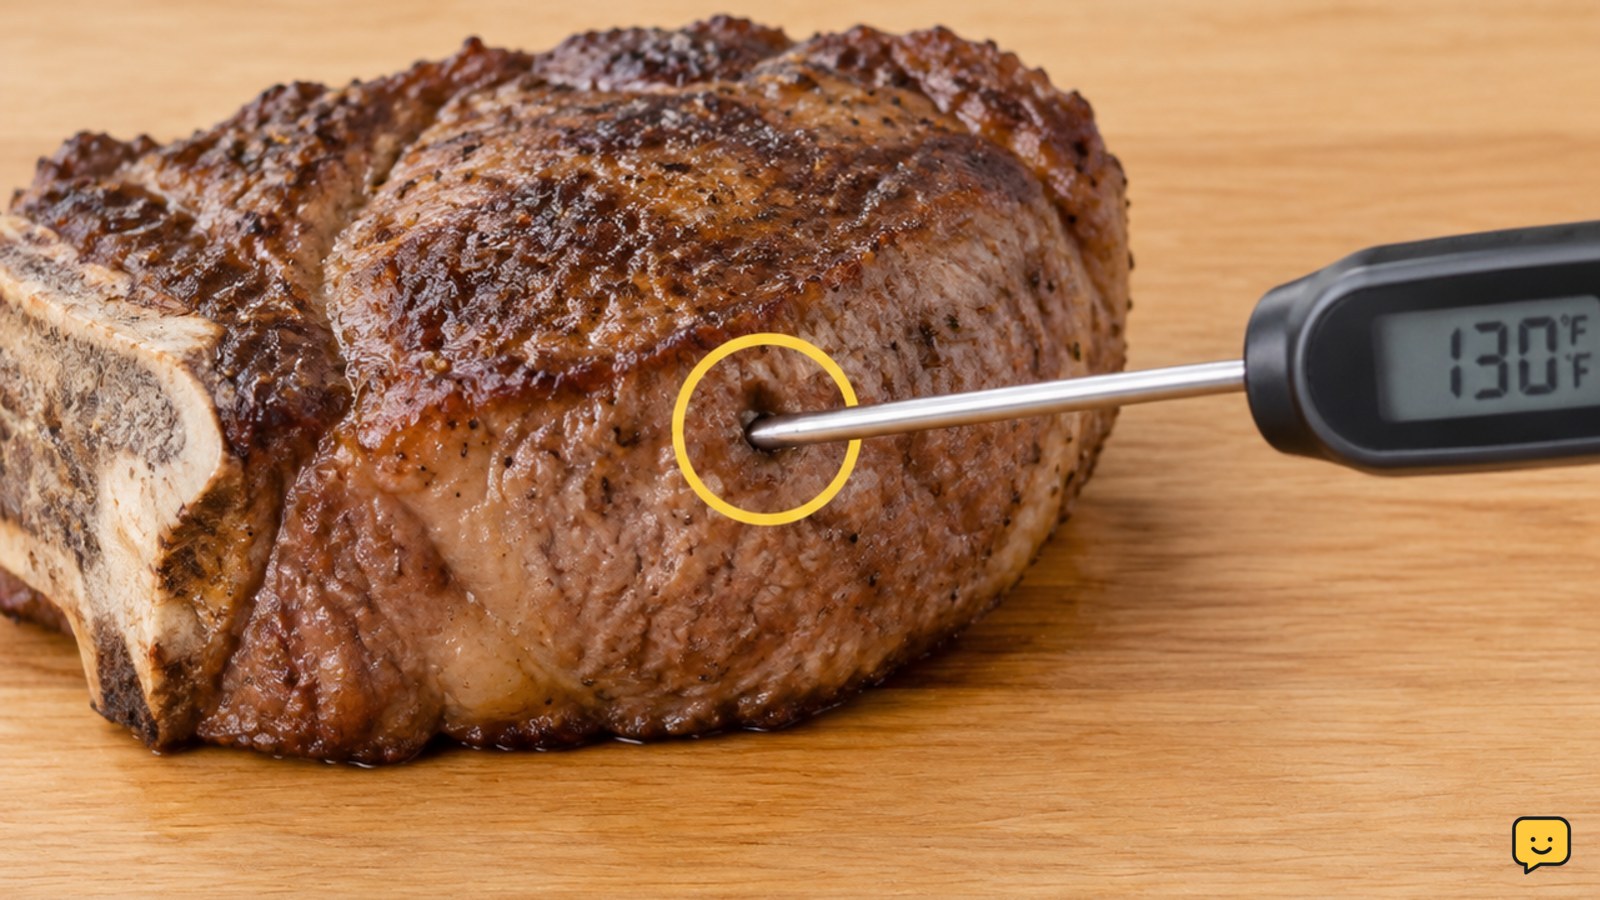
Insert the thermometer probe into the thickest part of the meat, aiming for the center and avoiding bone, fat, and gristle. Wait until the reading stabilizes, then compare it with the safe minimum for that food. Check more than one spot in large or uneven pieces, and wash and sanitize the probe after handling raw meat.
For more help with this topic, use the Cooking Basics guides.
Choose the right thermometer for the cooking method
A meat thermometer should match the cooking method: an instant-read model is best for checking food near the end of cooking, while a leave-in probe is designed to remain in the meat during roasting or smoking. Check the manufacturer’s instructions before putting any thermometer in an oven, grill, fryer, or closed barbecue; not every model is heat-safe outside the food.
Before cooking, turn the thermometer on and confirm that the display responds. If the screen is faint, the battery is low, or the probe is bent or cracked, replace or repair the thermometer before relying on it. KitchenAid’s basic workflow also places choosing and testing the thermometer before inserting it into the meat.
Insert the probe into the thickest center
The thermometer probe measures the food around its sensor, so place the sensor in the thickest part of the meat. Insert it from the side when possible, aiming toward the center. Keep the tip away from bone, fat pockets, gristle, air gaps, and the cooking pan, because those locations can produce a misleading reading.
For a thin steak, chop, burger, or chicken breast, insert the probe horizontally so the sensor does not pass completely through the food. For a roast or whole chicken, test the thickest section and, where appropriate, another thick section. MEATER specifically advises inserting past the safety notch so the internal sensor is fully surrounded by food.
If you are checking a whole chicken, measure the thickest breast and the innermost part of the thigh without touching bone. The whole chicken thermometer method shows where those checks fit into roasting.
The whole chicken thermometer method shows where those checks fit into roasting.
Wait for a stable reading and compare the safe minimum
A meat thermometer reading is ready when the numbers stop moving noticeably. Instant-read models may settle in several seconds; Cook’s Direct advises allowing roughly 10 seconds for the temperature to register fully. Do not read the display while the tip is still moving through the meat, and do not rely on the outside color alone.
Use the safe minimum for the specific food, not one universal number: poultry requires 165°F (74°C); ground meats generally require 160°F (71°C); and whole cuts of beef, pork, lamb, and veal generally require 145°F (63°C) followed by a rest. Check the package or current food-safety guidance when the product is stuffed, mechanically tenderized, cured, or otherwise unusual.
For a large roast, test at least two locations. The lowest reading controls. If it is below the target, return the food to the heat and check again after a short interval. If the reading is above target but the meat is still cooking, remove it when the recipe’s intended doneness is reached and account for carryover cooking.
For a pork roast, temperature checks work alongside cooking time and texture; the slow cooker pork roast method explains how to combine the reading with tenderness checks.
The slow cooker pork roast method explains how to combine the reading with tenderness checks.
Verify an unusual reading before serving
An unusual thermometer reading should be verified by repositioning the probe rather than accepted immediately. If the number is much lower than expected, move the tip deeper into the thickest center and avoid bone or the pan. If it is unexpectedly high, test a second spot and confirm that the tip did not touch a hot cooking surface.
Thin foods can be difficult to measure because the sensor may extend through the far side. Insert horizontally and use the smallest practical probe angle. Uneven pieces can also contain hot and cool zones, so test the coolest-looking or thickest area first.
If two clean, correctly positioned checks disagree substantially, treat the lower result as the safety reading. If the display remains frozen or changes wildly, stop cooking by guesswork and replace or verify the thermometer. A calibration check in ice water may help identify a faulty instrument, but follow the manufacturer’s instructions for the model rather than adjusting it blindly.
Clean the probe after every raw-meat check
Clean and sanitize the thermometer probe after it touches raw meat, poultry, or juices and before it touches cooked food. Wash the probe with hot, soapy water, rinse it, and sanitize it according to the thermometer’s care instructions. Keep water away from electronics unless the manufacturer states that the complete unit is waterproof.
Wipe the probe dry before storing it. Do not place a dirty thermometer on a counter, clean plate, or serving utensil. If the probe was used in raw food and then inserted into cooked food without cleaning, treat the cooked food and utensil as contaminated and clean them before continuing.
Frequently asked questions
Can a meat thermometer touch the bone?
No. Bone can distort the reading and make the food appear hotter than the surrounding meat. Insert the probe into the thickest flesh beside the bone, then test another nearby spot if the result seems unusually high.
How long should a meat thermometer stay in the meat?
Keep it in place until the display stabilizes. Many instant-read thermometers settle within several seconds, while Cook’s Direct recommends roughly 10 seconds for the temperature to register fully. A leave-in probe stays in the food according to its manufacturer’s instructions.
Where do you put a thermometer in a thin steak?
Insert the probe horizontally through the side toward the center of the steak. This keeps the sensor surrounded by meat instead of letting it pass through the top or bottom. Avoid the pan and test a second location if the steak is uneven.
How do you know whether a meat thermometer is accurate?
First inspect the probe and battery, then follow the manufacturer’s calibration or ice-water-check instructions. A reading that stays frozen, changes erratically, or differs greatly between correctly positioned checks is not reliable enough for serving decisions; replace or verify the thermometer.
Should you leave a meat thermometer in while cooking?
Only if it is specifically designed for continuous cooking and the manufacturer permits that use. Leave-in probes are made for roasting, grilling, or smoking, but an ordinary instant-read thermometer should be inserted briefly and removed before closing the oven or grill.