To reseal a window, inspect the existing bead for cracks, peeling or gaps, remove the failed sealant, clean and dry the joint, then apply a compatible exterior window sealant in one steady bead. Let it cure according to the label and check for drafts or moisture. Stop if the frame, glass or surrounding wall is damaged.
Check whether the window needs new sealant
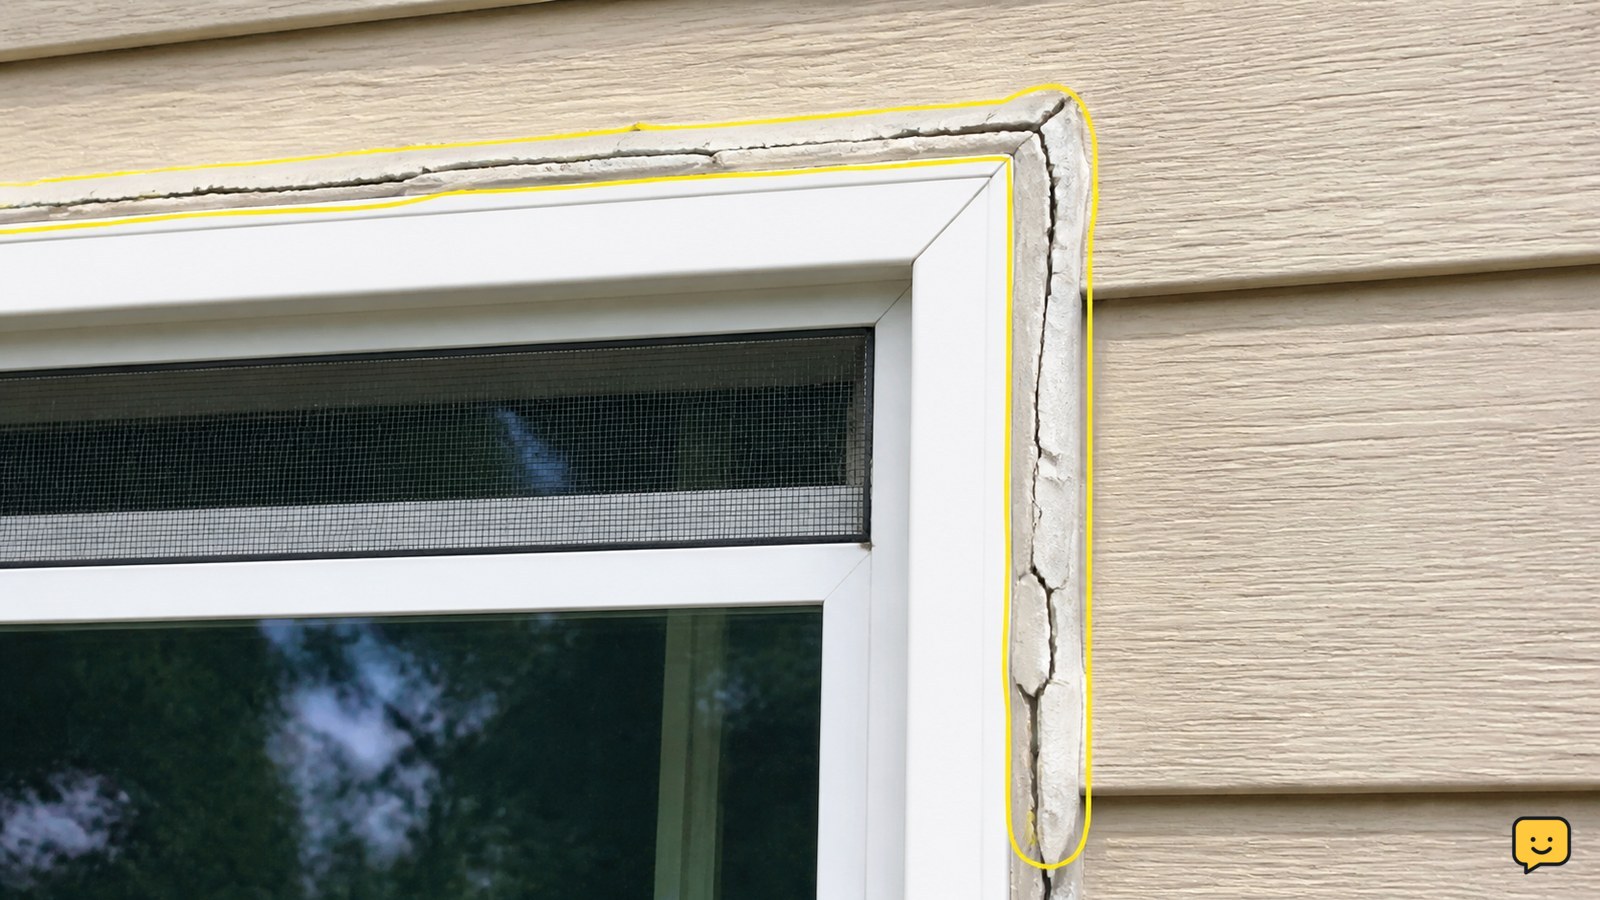
Cracked, peeling, separated or visibly shrunken sealant is a clear reason to reseal the window. GE Sealants recommends starting with a close inspection of the existing sealant, looking for visible wear along the exterior window frame.
Check the full perimeter, including the top corners and lower corners. Look for a continuous joint between the frame and the surrounding wall or trim. A draft, damp edge or water mark supports the case for repair, but it does not prove that the sealant is the only cause.
Press the frame gently and look for movement. If the frame is loose, damaged or separated from the wall, resealing alone is unlikely to solve the problem. Do not cover structural damage with a new bead.
Remove the failed sealant without damaging the joint
Remove the old bead wherever it is cracked, peeling or detached; fresh sealant adheres poorly to loose residue. Score both edges of the bead with a utility knife, then pull or scrape it away in manageable lengths.
Use a sealant scraper or plastic tool near painted surfaces and the frame. Work slowly at corners, where excess pressure can gouge trim or siding. Remove as much of the compromised material as possible rather than applying new sealant over a visibly loose layer.
If the old material will not release cleanly, stop and reassess the surface. Cutting deeper may damage the window or weather barrier, creating a larger repair than the original gap.
Clean and dry the window joint
Clean the exposed joint until it is free of dust, grease, old adhesive residue, mold and moisture. These preparation points are also emphasized in the Home Makeover NJ procedure because contamination can prevent the new bead from bonding.
Brush out loose particles, wipe the area with a suitable mild cleaner, and remove remaining residue with clean rags. Do not leave standing water in the joint. Allow the surface to dry fully before applying sealant.
Run a dry finger or clean cloth along the joint as a final check. If it picks up grit, residue or moisture, clean and dry the area again. Masking tape on each side of the joint can help keep the bead on the intended surface.
Apply a continuous exterior window seal
Apply fresh sealant only after the joint is clean, dry and ready for the product. Select a window-rated exterior sealant that matches the materials around the joint and follow the cartridge label for application and cure requirements.
Cut the nozzle to produce a bead slightly narrower than the joint, then puncture the inner seal if the cartridge requires it. Hold the caulk gun at about a 45-degree angle and move steadily, as described in the Home Makeover NJ guide. Keep the nozzle in contact with the joint so the bead fills the gap rather than riding over it.
Release pressure at the end of each run to reduce excess sealant. Tool the bead promptly with a damp tool or gloved finger if the label permits it. Press the sealant into the joint and smooth it into a continuous, slightly concave surface. Remove masking tape before the sealant skins over.
Verify the cured bead and find the failure point
A successful reseal leaves a continuous bead with no pinholes, open corners, lifted edges or visible gaps. The sealant should contact both sides of the joint and remain attached when viewed after the product’s stated cure period.
After curing, inspect the perimeter again in daylight. On a cool or windy day, move the back of your hand slowly around the frame to identify a remaining draft, but do not use an open flame near the window.
If air or water still enters, compare the leak location with the new bead. A gap in the bead can be cleaned and repaired if the product permits it. If the bead is continuous but the leak remains, the source may be the sash, glass unit, frame, wall connection or another opening. Stop adding layers and arrange a professional inspection.
Choose an alternative when resealing is not the right repair
Use a different repair path when the symptom does not match a failed exterior seal. Resealing is appropriate for deteriorated sealant at the frame-to-wall or trim joint, not for every window leak or draft.
If the sealant is sound but the sash still allows air through, inspect the window’s moving parts and manufacturer instructions instead of covering the operating gap. If moisture appears between double-glazed panes, the sealed glass unit may have failed and usually needs a glass or window-service assessment.
For a loose, rotten or distorted frame, repair the underlying installation or structure before applying new sealant. A new surface bead can hide the symptom while allowing water to continue behind the assembly.
Frequently asked questions
How do I know if a window needs resealing?
A window needs resealing when the existing exterior bead is cracked, peeling, shrunken, separated from the frame or visibly open at a corner. Drafts or dampness can support the diagnosis, but inspect the frame, sash, glass and surrounding wall too. If any of those parts are damaged or loose, sealant alone may not be the correct repair.
Can I apply new sealant over old window caulk?
Usually, remove failed or loose sealant first. New material may not bond reliably to cracked, peeling or contaminated residue, and the defect can remain underneath. Cut and scrape away the compromised bead, then clean and dry the joint. Stop if removal risks damaging the frame, siding or glazing.
What should I do if the window still leaks after resealing?
First, confirm that the new bead has fully cured and inspect it for pinholes, open corners or lifted edges. Repair a localized bead defect only if the product allows it. If the bead is continuous but water or air still enters, the cause may be the sash, glass, frame or wall connection; stop adding sealant and seek a qualified inspection.
How long should fresh window sealant dry before rain?
Wait according to the sealant label, because cure and rain-exposure limits vary by product and weather. The joint must remain clean and dry during the required period. If rain or condensation reaches uncured sealant, inspect the bead afterward; if it has washed out, developed gaps or lost contact, remove the failed portion and repair it only under suitable conditions.
For more help with this topic, use the Home Maintenance guides.