To fix printer streaks, check the ink or toner level, run the printer’s built-in cleaning cycle, and print a nozzle-check or test page. If streaks remain, replace a low cartridge and use the correct paper and higher print-quality setting. Stop repeated cleaning if the page does not improve, because the printer may need a cartridge, drum, or service replacement.
Browse more Home Electronics guides
Check whether the streaks come from ink, toner, or paper
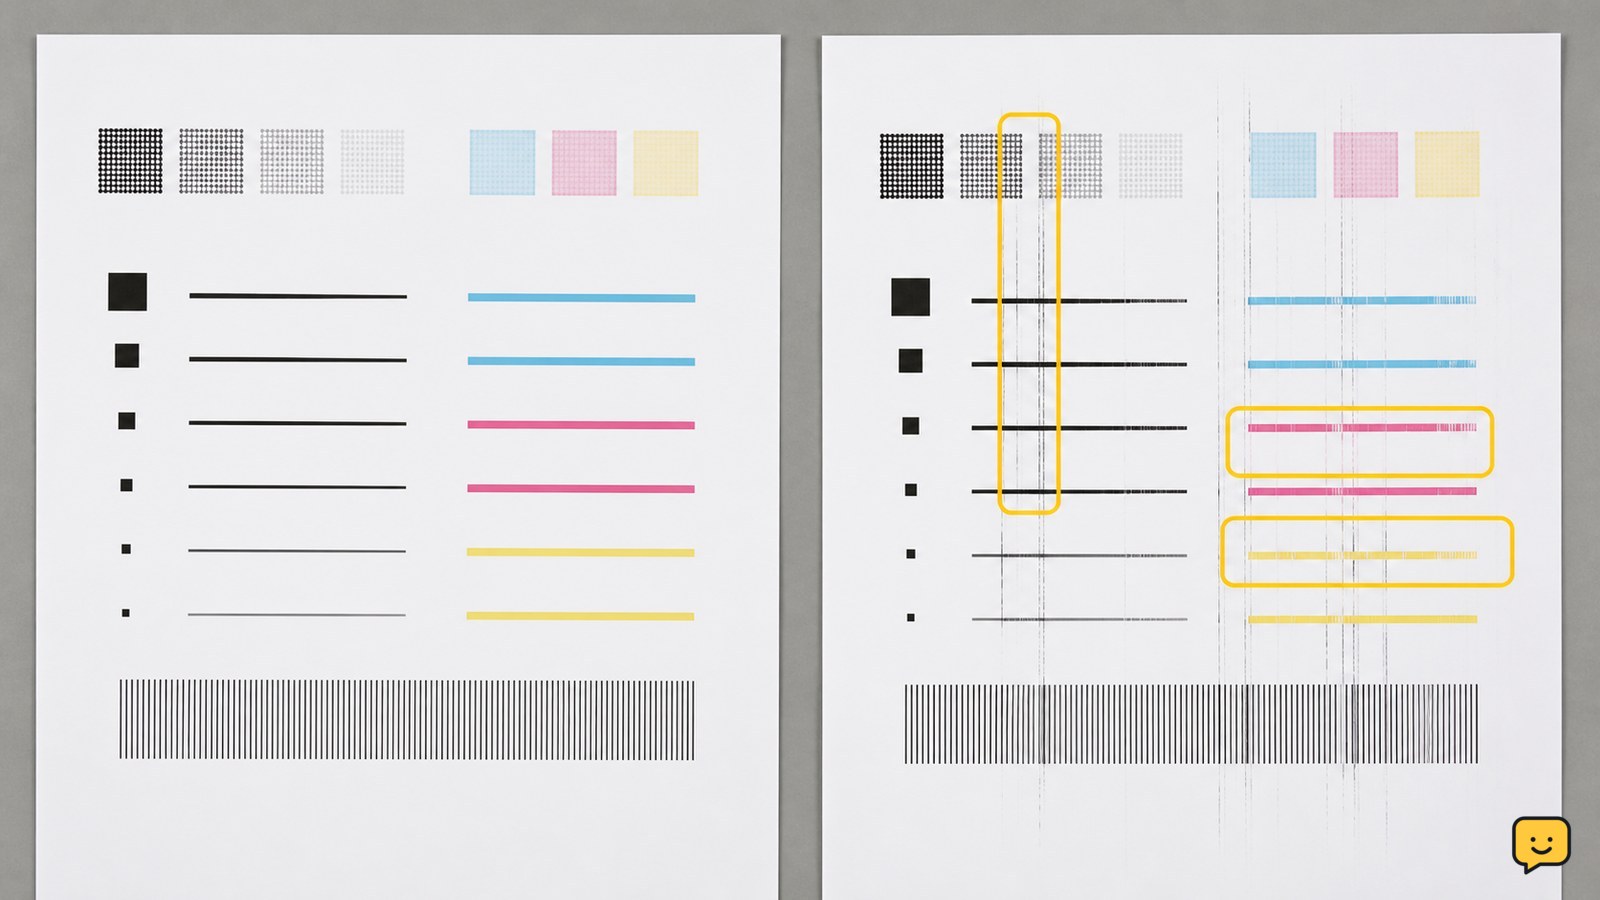
Printer streaks are easier to diagnose when you first identify their pattern and the printer type. Inkjet printers commonly show missing color, thin horizontal lines, or white bands. Laser printers may show repeated marks, pale areas, or a line that appears in the same place on each page.
Print a built-in test page, nozzle-check page, or configuration page from the printer’s control panel or companion software. If the printer’s own test page is streaked, the problem is probably inside the printer or cartridge rather than in the document or application.
If only one document is affected, print a different file or a plain text page. If the second page is clean, check the original document, image, print preview, and application settings before cleaning the printer.
Check the cartridge level and seating
A low or empty ink or toner cartridge can cause pale bands and uneven coverage, so check the level shown on the printer display or in its printer utility. Technology Solutions Inc. lists checking ink or toner levels as an early fix for streaking.
- Open the cartridge or toner-status screen.
- Note whether one color is low, empty, or reporting an error.
- Remove and reseat the affected cartridge only if the printer’s instructions allow it.
- Replace a cartridge that is empty, leaking, damaged, or still reported as unusable after reseating.
Print the same test page again. If the streaks disappear after replacement, stop troubleshooting. If the pattern is unchanged, continue to the printer’s cleaning procedure rather than replacing additional cartridges without evidence.
Run one printer cleaning cycle and print a test page
The printer’s built-in cleaning or print-head cleaning cycle is the safest first cleaning method for inkjet streaks. Open the printer’s Settings, Maintenance, Tools, or Utility area and select the control named Clean Print Head, Clean Cartridges, or a similar option; the exact label varies by model.
- Load the paper type recommended for ordinary printing.
- Start one cleaning cycle and wait for it to finish.
- Print a nozzle-check or test page immediately afterward.
- Compare the new page with the original page, looking for fewer missing lines or lighter bands.
Toner Giant also identifies the cartridge or print-head cleaning process as a standard first step for lines in printouts. If the test page improves, a second cycle may be reasonable when the printer permits it. If there is no improvement after the allowed cleaning attempts, stop repeating the cycle and follow the failure path below.
Adjust print quality, paper, and media settings
Incorrect paper or quality settings can make streaks more visible, especially when the printer is using a quick or draft mode. Technology Solutions Inc. recommends checking print settings, quality, and media when streaking continues.
- Open the print dialog and select the printer’s normal or higher-quality mode instead of Draft, Quick, or Economy.
- Choose the paper or media type that matches the loaded stock.
- Confirm that the paper is clean, dry, flat, and within the printer’s supported range.
- Print a small test page before sending the full document.
If higher quality and the correct media setting remove the streaks, keep those settings for important prints. If the same lines remain in the printer’s own test page, settings are unlikely to be the only cause.
What to do if printer streaks remain
Persistent printer streaks after a cartridge check, cleaning cycle, and settings test usually indicate a cartridge or internal printer fault rather than a document problem.
For an inkjet printer, confirm that the replacement cartridge is the correct model and that its protective packaging or sealing strip has been removed as directed. Then print another nozzle-check page. Do not scrape the print head, insert sharp objects, or pour household cleaner into the printer.
For a laser printer, replace a low, damaged, or leaking toner cartridge using the model’s instructions. If the streak repeats at the same position on every page, or remains after a known-good cartridge, stop before opening the fuser or other enclosed areas. The printer may require a manufacturer-approved drum, imaging-unit, or service procedure, depending on its design.
Success means the test page is clean or the repeated marks are gone on several ordinary pages. If the test page still fails after the supported maintenance steps, record the printer model, cartridge status, error message, and a sample page before contacting the manufacturer or a qualified repair service.
Frequently asked questions
Why is my printer leaving horizontal lines on the page?
Horizontal lines often point to blocked ink nozzles, a low cartridge, or a draft-quality setting. Print a nozzle-check or test page first. If the printer’s own test page has missing lines, check the cartridge and run the built-in cleaning cycle. If only one document has lines, inspect that document and its print settings instead.
Can printer streaks be fixed by changing the paper?
Sometimes. Load clean, dry, flat paper and select the matching media type in the print dialog. Also switch from Draft or Quick mode to normal or higher quality. If streaks remain on the printer’s built-in test page, changing paper alone will not correct the underlying cartridge or printer fault.
How many times should I run a print-head cleaning cycle?
Run one cycle, print a test page, and repeat only when the printer’s instructions permit it and the page is improving. Stop when repeated cycles produce no visible change. Cleaning consumes ink, and persistent streaks may require a cartridge replacement or service instead.
Why does my laser printer print a repeated streak in the same place?
A repeated mark in the same position can indicate a toner cartridge or internal imaging component problem. Check the toner status and replace a low, damaged, or leaking cartridge as directed. If the mark remains with a suitable replacement, do not open the fuser; use the manufacturer’s service guidance.