To tell whether an email forwarding rule was added without permission, open your email provider’s Rules, Filters, and Forwarding settings and look for unfamiliar destinations or actions. Then review recent sign-ins, sessions, connected apps, and security changes. If you find an unauthorized change, document it, remove the rule, change your password, and enable two-factor authentication.
1. Check mailbox rules and filters first
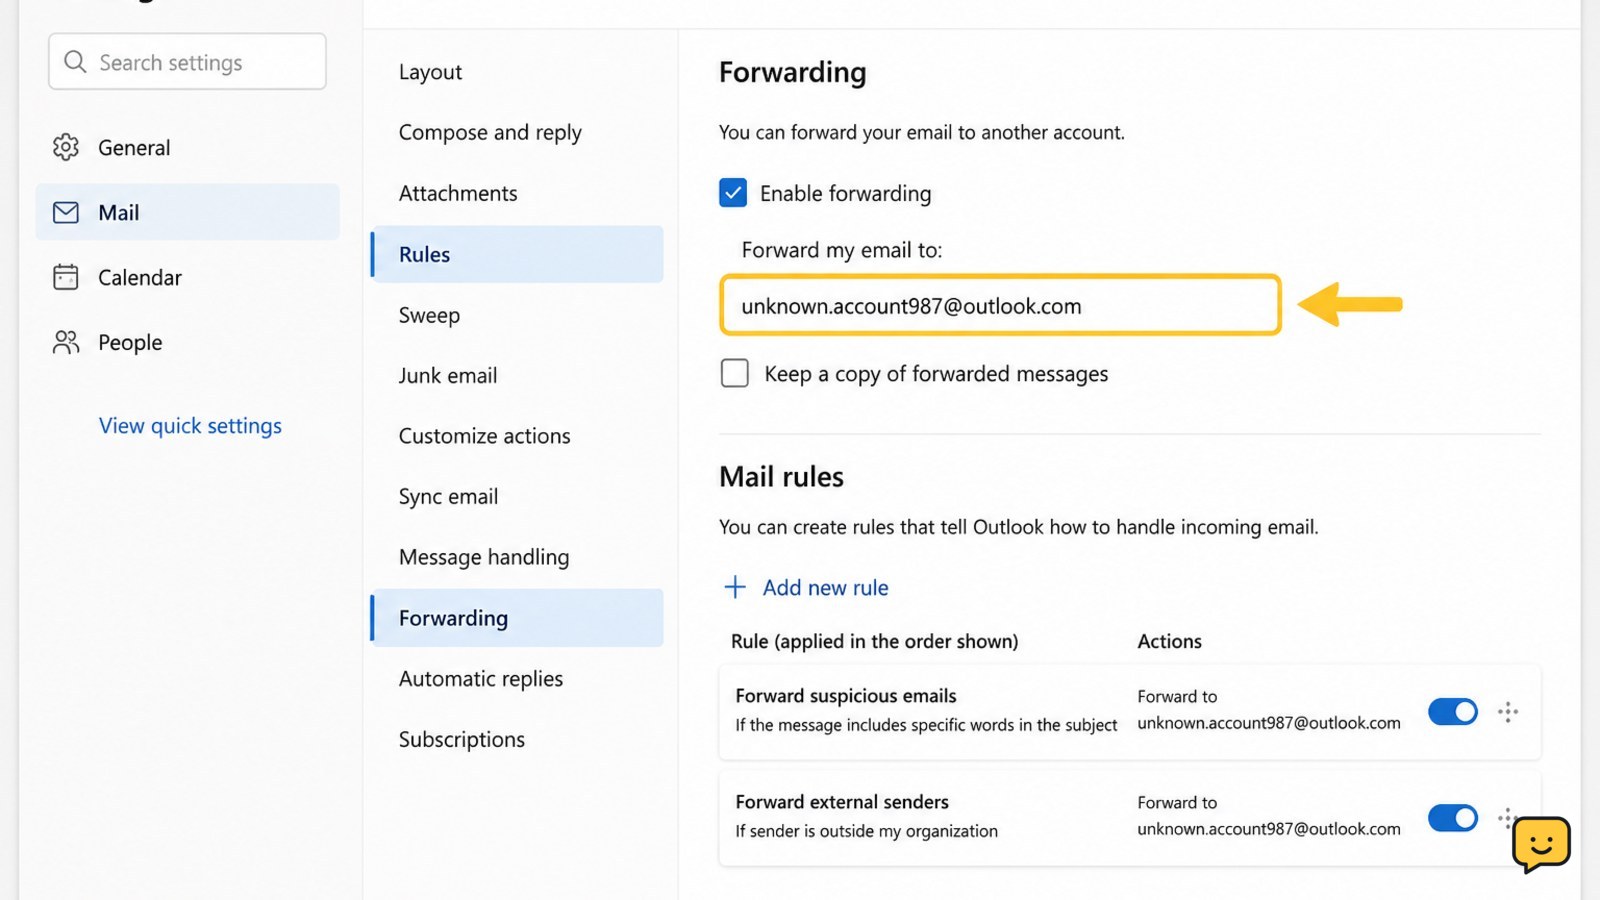
Open your provider’s web settings and find the area named Rules, Filters, Inbox rules, or something similar. Review every active rule, not only rules containing the word “forward.”
Look for actions such as forward to, redirect to, send a copy to, forward as an attachment, delete, archive, or mark as read. Attackers may combine forwarding with deletion or archiving to hide the evidence.
Record the rule name, conditions, actions, destination address, and any visible creation or modification date. An unfamiliar external address, an unusually broad condition, or a rule that affects invoices, password resets, or all incoming mail is a strong warning sign.
In Microsoft 365, Microsoft documents checking current mailbox rules with Get-InboxRule and identifying rule changes through unified audit logs. Regular users should ask their administrator to perform that audit check rather than attempting administrative commands themselves.
2. Review automatic forwarding and forwarding addresses
Check the separate Forwarding, Mail forwarding, or Automatic forwarding setting. This is different from an inbox rule and may continue sending every new message to another address even when the Rules or Filters list looks normal.
Confirm whether forwarding is enabled and inspect the complete destination address. Check for addresses you do not recognize, including addresses that differ from a trusted contact by one character or use an unfamiliar domain.
Also review approved forwarding addresses or verification entries. Remove an unauthorized destination only after recording it. If the provider requires confirmation before forwarding starts, check whether a confirmation message was sent to an address you control.
Verification: after removing an unauthorized setting, refresh the page or sign out and back in. Confirm that forwarding is disabled or points only to an address you intentionally approved. Send a test message from another account and verify that it arrives only where expected.
3. Check sign-in activity, sessions, and connected apps
Open the account’s Recent activity, Sign-in activity, Devices, or Sessions page. Compare locations, times, browsers, operating systems, and devices with your normal use. A location can be approximate, so treat it as a clue rather than proof.
Look for activity shortly before the forwarding rule appeared. Pay particular attention to successful sign-ins you cannot explain, new devices, unfamiliar browser sessions, password changes, recovery-method changes, or security settings being disabled.
Review Connected apps, App passwords, Delegates, and Mail clients if your provider offers them. An approved application or delegate may be able to read or copy messages without a visible forwarding rule.
If an entry is unfamiliar, capture its date and details, then use the provider’s official controls to sign it out or remove access. Do not rely on an email alert alone: alerts can be delayed, overlooked, or sent to a recovery address you no longer control.
4. Secure the account if a change was unauthorized
Use a trusted device and change the email password through the provider’s official account page. Choose a unique password that you do not use on another service. If you reused the old password elsewhere, change it on those services too, starting with banking, shopping, and social accounts.
Enable two-factor authentication with an authenticator app, passkey, or security key when available. Review recovery email addresses and phone numbers, remove unfamiliar methods, and replace outdated ones. Check that the attacker did not add a new authentication method before you finish.
Sign out of other sessions after changing the password, then revisit Rules, Filters, Forwarding, Delegates, Connected apps, and App passwords. A rule that reappears after removal suggests that another session, application, or device still has access.
Failure path: if you cannot change the password, cannot receive verification codes, or the recovery details were changed, use the provider’s official account-recovery process. Do not pay anyone who claims to restore access or share a verification code with a person who contacts you unexpectedly.
5. Verify that message exposure has stopped
After securing the account, check Sent, Trash, Archive, Spam, and deleted-rule areas for related activity. Look for messages you did not send, replies you did not write, password-reset emails, delivery notices, or messages that were moved or deleted unexpectedly.
Send a harmless test message from a separate account and confirm that it reaches your mailbox without being redirected, deleted, or marked read unexpectedly. Repeat the test after signing out of old sessions if the provider permits it.
For a personal account, continue monitoring sign-in and security activity for several days. For a work or school account, provide the administrator with your notes and timestamps. Microsoft’s mailbox-rule guidance explains that audit logs can help identify who created, modified, or deleted a rule.
If the forwarding setting stays disabled, no unfamiliar access remains, and test messages behave normally, the immediate forwarding risk has been addressed. Continue to the provider’s recovery process or administrator review if any suspicious access remains.
Frequently asked questions
Can an email forward without a forwarding rule?
Yes. A filter, inbox rule, delegate, connected app, mail client, or compromised device can copy, redirect, archive, or delete messages without appearing in the main forwarding setting. Check all mail-processing settings, connected applications, delegates, sessions, and devices.
What does an unauthorized email forwarding rule look like?
It may send all incoming messages to an unfamiliar external address, or target specific terms such as invoices, passwords, security alerts, or account recovery. Suspicious rules may also mark messages as read, archive them, or delete them after forwarding.
Should I delete an unknown forwarding rule immediately?
Record the destination, actions, conditions, and visible dates before deleting it. Then remove or disable the rule, change the account password, sign out other sessions, review recovery methods, and enable two-factor authentication. A work or school mailbox should also be reported to its administrator.
How can I tell who added a mailbox rule?
Personal email services may show only the current rule and limited security history. Microsoft 365 administrators can use mailbox-rule checks and unified audit logs to investigate who created, modified, or deleted rules. Save the approximate time and rule details before making changes.
Browse more Privacy & Online Safety guides for help with this topic.