To clear the cache in Microsoft Edge, open Edge and press Ctrl+Shift+Delete. Set Time range to All time, select Cached images and files, clear any unwanted options such as passwords or cookies, then select Clear now. Close and reopen the affected page. If the problem remains, test the site in an InPrivate window before deleting more data.
For more help with this topic, use the Computers Internet guides.
Open Edge’s Clear browsing data controls
Microsoft Edge provides the cache controls under Settings and more, then Settings, followed by Privacy, search, and services. Open Edge, select the three-dot menu in the upper-right corner, and choose Settings.
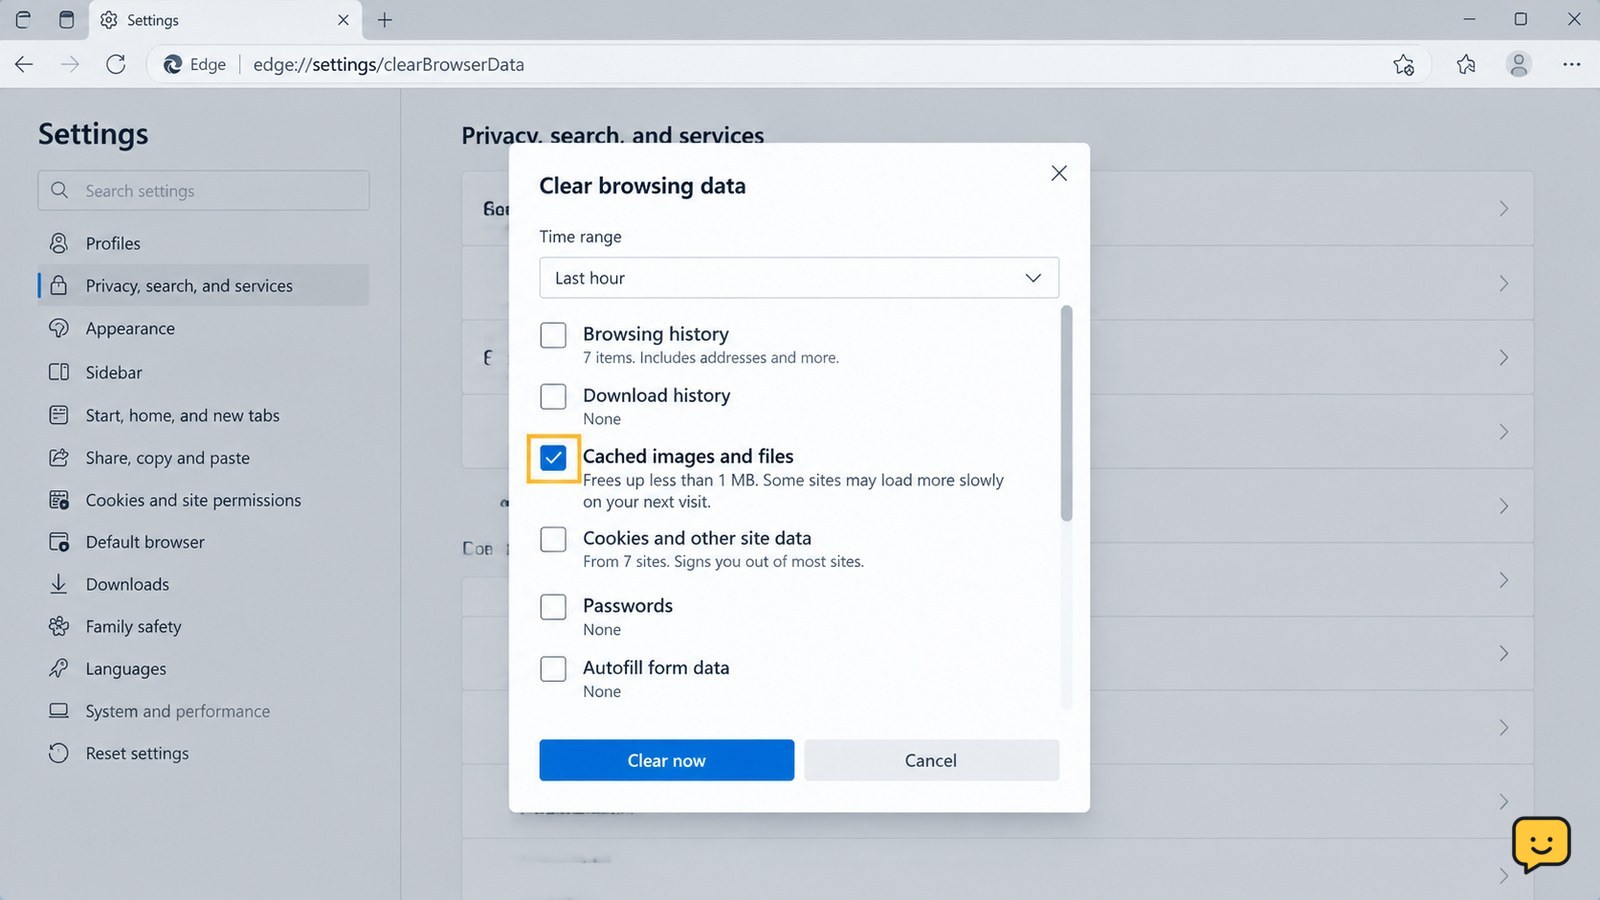
Select Privacy, search, and services. In the Clear browsing data area, select Choose what to clear. Microsoft’s support instructions use this path for deleting browsing data.
If you want the quicker route, press Ctrl+Shift+Delete while Edge is active. The Clear browsing data panel should open directly. If nothing happens, click an Edge tab first and press the shortcut again.
Select cached images and files without deleting passwords
In the Clear browsing data panel, choose a Time range. Select All time when you want to remove the complete stored cache, or choose a shorter period when the problem began recently.
Enable Cached images and files. This is the option that removes locally stored copies of website resources, such as images and page files, so Edge can download fresh versions.
Leave Passwords, Autofill form data, and other categories unchecked unless you specifically want to remove them. Cookies and other site data are separate from cached files and may sign you out of websites. Microsoft Edge’s support guidance lists these categories separately, so clearing the cache alone does not require deleting saved passwords.
Clear the selected Edge cache
After checking the selections, select Clear now. Wait for the control to finish before closing the panel. The duration depends on how much data Edge has stored.
For a normal cache cleanup, the only required selection is Cached images and files. If a site still displays an old login state, broken layout, or incorrect account session, you may need to clear that site’s cookies separately—but do not do this first if you need to preserve the sign-in.
Close the Clear browsing data panel after the operation completes. If Edge appears unresponsive, wait briefly and check whether the panel has returned to its normal state before trying the action again.
Reload the affected page and verify the result
Reload the website that was showing the problem. A successful cache clear usually means the page loads again, the layout displays correctly, or recently changed content appears. The first reload may take longer because Edge must download fresh files.
Test the same action that failed before, such as opening a page, loading an image, or submitting a form. If it works after the cache is cleared, the cached files were a likely contributor.
If the page still fails, open an InPrivate window from the three-dot menu and test the same address there. If the site works in InPrivate but not in a regular window, saved cookies, extensions, or profile-specific settings are more likely than the general cache. Avoid repeatedly clearing all data without identifying which category is involved.
Choose the safer next step when clearing cache does not help
Clearing Edge’s cache cannot repair a website outage, an expired account, a blocked network connection, or a problem caused by the website itself. If the same error appears in both a regular window and an InPrivate window, record the exact message and check whether other websites load normally.
If other sites work but one site fails, contact that site or check its service status rather than deleting passwords and cookies broadly. If many sites fail, check the computer’s network connection and browser restrictions before clearing more personal data.
If the Clear browsing data panel is unavailable or controlled by an organization, stop at that point. Managed Edge settings may prevent users from changing browsing-data policies, and bypassing those controls can remove required workplace protections.
Frequently asked questions
Does clearing the Edge cache delete saved passwords?
No. Selecting only Cached images and files does not delete saved passwords. Passwords are a separate clearing category. Review every checked option before selecting Clear now, especially on a shared or work computer.
What is the keyboard shortcut to clear cache in Edge?
Press Ctrl+Shift+Delete in an active Microsoft Edge window. This opens the Clear browsing data panel, where you can choose a time range and select Cached images and files.
Should I clear cookies as well as the Edge cache?
Usually not at first. Clear the cache alone when pages show outdated files or a broken layout. Clear cookies only when a site’s login or session data is the suspected cause, because removing them can sign you out.
How can I tell whether the Edge cache was cleared?
Reload the affected page and repeat the action that previously failed. Freshly loaded images, corrected page formatting, or updated content are useful signs. The first reload may be slower because Edge is downloading new files.