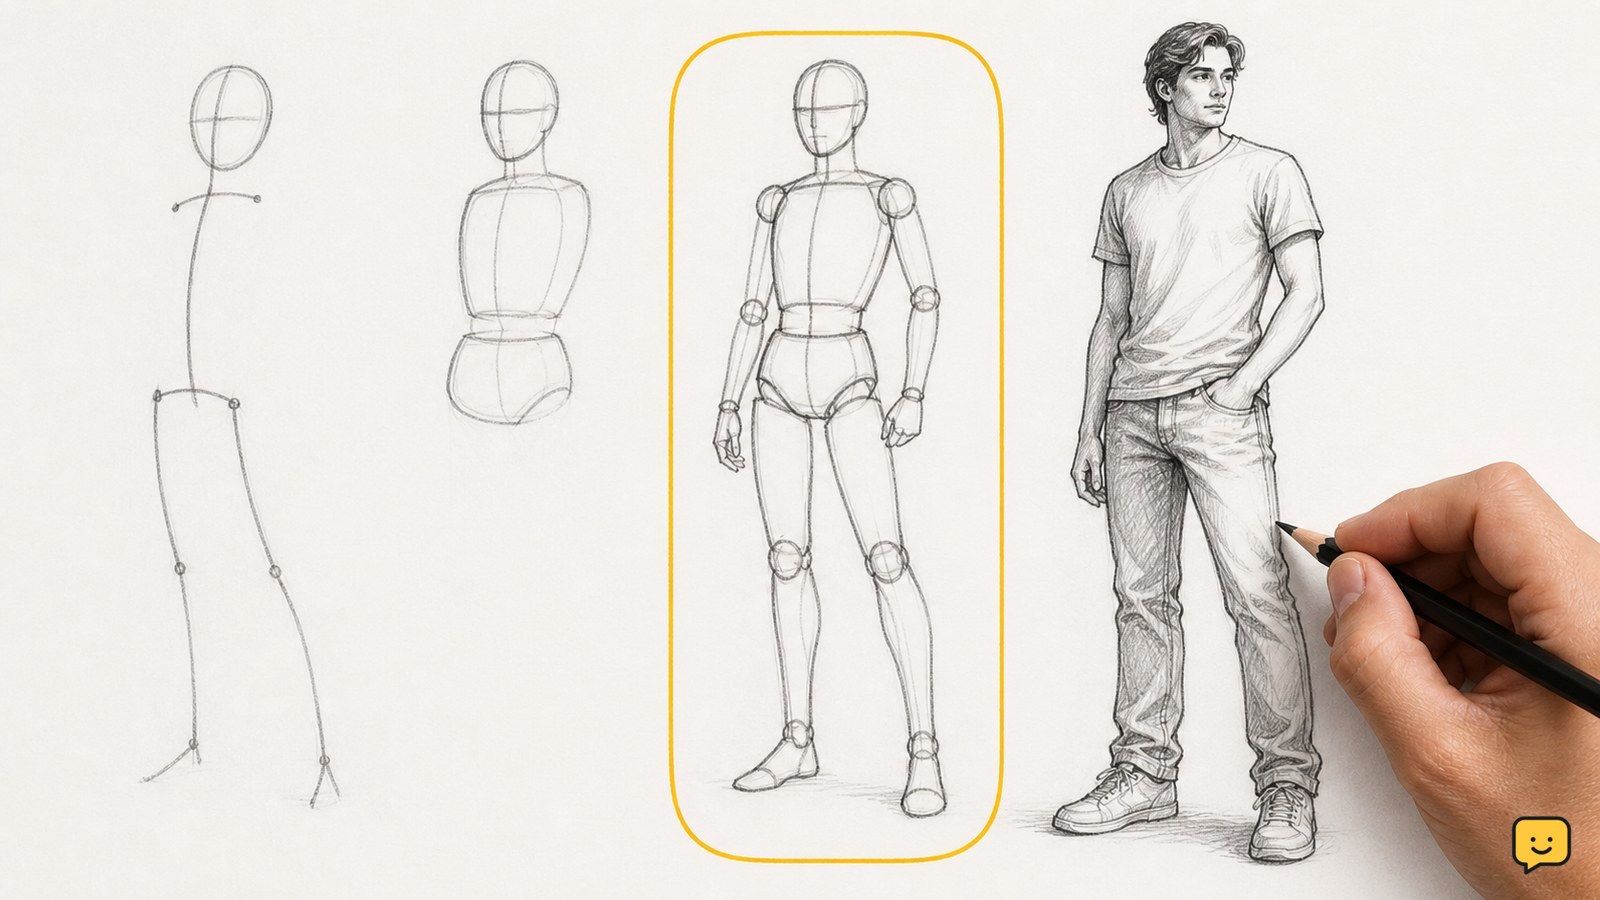
To draw a person, begin with a light gesture line, add the head and torso as simple shapes, place the hips and major joints, then connect the limbs. Check the figure’s balance and proportions before adding clothing, facial features, hands, hair, and shading. Use a photo or mirror reference when possible, and erase construction lines gradually.
Choose a pose and mark the figure’s balance
Choose a standing, seated, or relaxed pose and first mark the person’s balance with one light line. This gesture line can run from the head through the chest and hips, showing whether the figure is upright, leaning, or turning.
- Place a small oval for the head.
- Draw a loose line through the head, ribcage, pelvis, and supporting foot.
- Mark where the feet touch the ground.
Check: the supporting foot should sit beneath the body rather than far outside it. If the figure looks as though it would fall, redraw the gesture before adding anatomy.
Build the head, torso, and hips from simple shapes
Build the person from three large forms: an oval or box for the head, a rounded shape for the ribcage, and a tilted shape for the pelvis. These forms make the pose easier to adjust than a finished outline.
- Attach the neck between the head and ribcage.
- Angle the ribcage and pelvis to match the pose.
- Use a center line on the face and torso to show the direction the person is facing.
Keep these shapes light and separate. A common failure is making the torso a single flat tube; separating the chest and pelvis makes bends and turns clearer. Anna Bregman Portraits also uses a structured approach for portrait drawing, including a grid when copying from a photograph.
Place the joints before connecting the limbs
Place the shoulders, elbows, wrists, knees, and ankles as small marks before drawing arms and legs. The joints act as checkpoints that keep each limb connected to the correct part of the body.
- Draw a line from each shoulder to the elbow and wrist.
- Connect the hips to the knees, then the knees to the ankles.
- Wrap each limb with tapered cylinders or simple block shapes.
- Add hands and feet as simplified mitten and wedge shapes.
Check: each limb should bend at a marked joint, and the elbows and knees should point in the same direction as the reference pose. If an arm or leg looks too short, compare the distance between its joint marks rather than stretching the finished outline.
Refine the silhouette, clothing, and major features
Refine the person’s outer silhouette only after the main forms and joints line up. Draw the body contour around the construction shapes, then add clothing as a separate layer of shapes that follows the body underneath.
- Trace the shoulders, waist, hips, and limbs with a cleaner line.
- Show clothing folds where fabric bends, bunches, or hangs from a point of tension.
- Divide the head with light horizontal and vertical guides before placing the eyes, nose, and mouth.
- Add hair as larger masses first, then a few strand lines.
For a face turned partly away, keep the center line curved around the head instead of drawing it straight down the page. The supplied beginner drawing series focuses on learning face parts and combining them into a whole face, so practice the face separately when the full figure becomes too difficult.
Check proportions, line weight, and the finished drawing
Check the completed figure by comparing its largest relationships before adding shading. Look at the head-to-body size, shoulder-to-hip angle, limb lengths, hand and foot placement, and the space around the silhouette.
- Hold the drawing beside the reference or view it in a mirror to spot leaning and uneven spacing.
- Erase construction lines that no longer help the pose.
- Use darker lines for the final silhouette and important overlaps.
- Add a small amount of shading under the hair, chin, clothing folds, and areas where forms overlap.
Success looks like: the person has a clear pose, both feet or the seat connect convincingly to a surface, the limbs attach at believable joints, and the face points in the same direction as the head.
If the drawing still feels wrong, do not redraw every detail. Lightly circle the first problem you notice—balance, torso angle, joint placement, or head direction—and correct that large area on a fresh pass.
Frequently asked questions
What is the easiest way to draw a person for beginners?
The easiest method is to use a stick-figure gesture first, then replace the head, chest, pelvis, arms, and legs with simple 3D shapes. This keeps the pose readable while you learn where joints and body masses belong. Add facial features, clothing, fingers, and shading only after the large shapes are working.
How do I draw a person from a photo?
Start by copying the pose’s gesture and major angles rather than outlining every detail. You can also place a light grid over the reference and paper, then compare the head, shoulders, hips, and joint positions square by square. Anna Bregman Portraits describes a grid-based approach for portrait work from photographs.
Why does my person drawing look stiff?
A stiff figure usually needs a clearer gesture and more variation between the shoulder and hip angles. Tilt the ribcage and pelvis in relation to the pose, bend the limbs at marked joints, and avoid making both sides perfectly symmetrical unless the reference is standing straight.
How can I draw hands and feet without adding too much detail?
Reduce each hand to a mitten or wedge and each foot to a tapered block. First match the direction, size, and attachment point. Add individual fingers or shoe details only when the simplified shape already supports the pose.
For more help with this topic, use the Crafts Sewing guides.