In Star Citizen, use the scan action assigned in your current keybindings, point it toward a nearby ship, and select the correct contact through the HUD or tactical display. Confirm that the contact readout updates before treating the ship as identified. Exact controls and displayed fields can change, so do not rely on older guide keybinds.
Browse more Star Citizen guides
Use your current scan control to inspect a nearby ship
Star Citizen ship scanning begins with the scan action assigned in your current keybindings. Aim your ship toward the nearby contact, activate that scan action, and keep the contact inside the relevant forward view long enough for the interface to process it. The supplied gameplay guides describe scanning as a way to inspect ships and cargo, but their examples are tied to older builds, so their keyboard shortcuts are not safe to copy as current instructions.
- Face the contact you want to inspect.
- Use the scan action shown in your own keybindings.
- Hold your aim steady until the HUD or contact readout changes.
A visible marker alone is not proof that the scan finished. Continue only when the interface shows information associated with that contact.
Select the correct contact in the HUD or tactical display
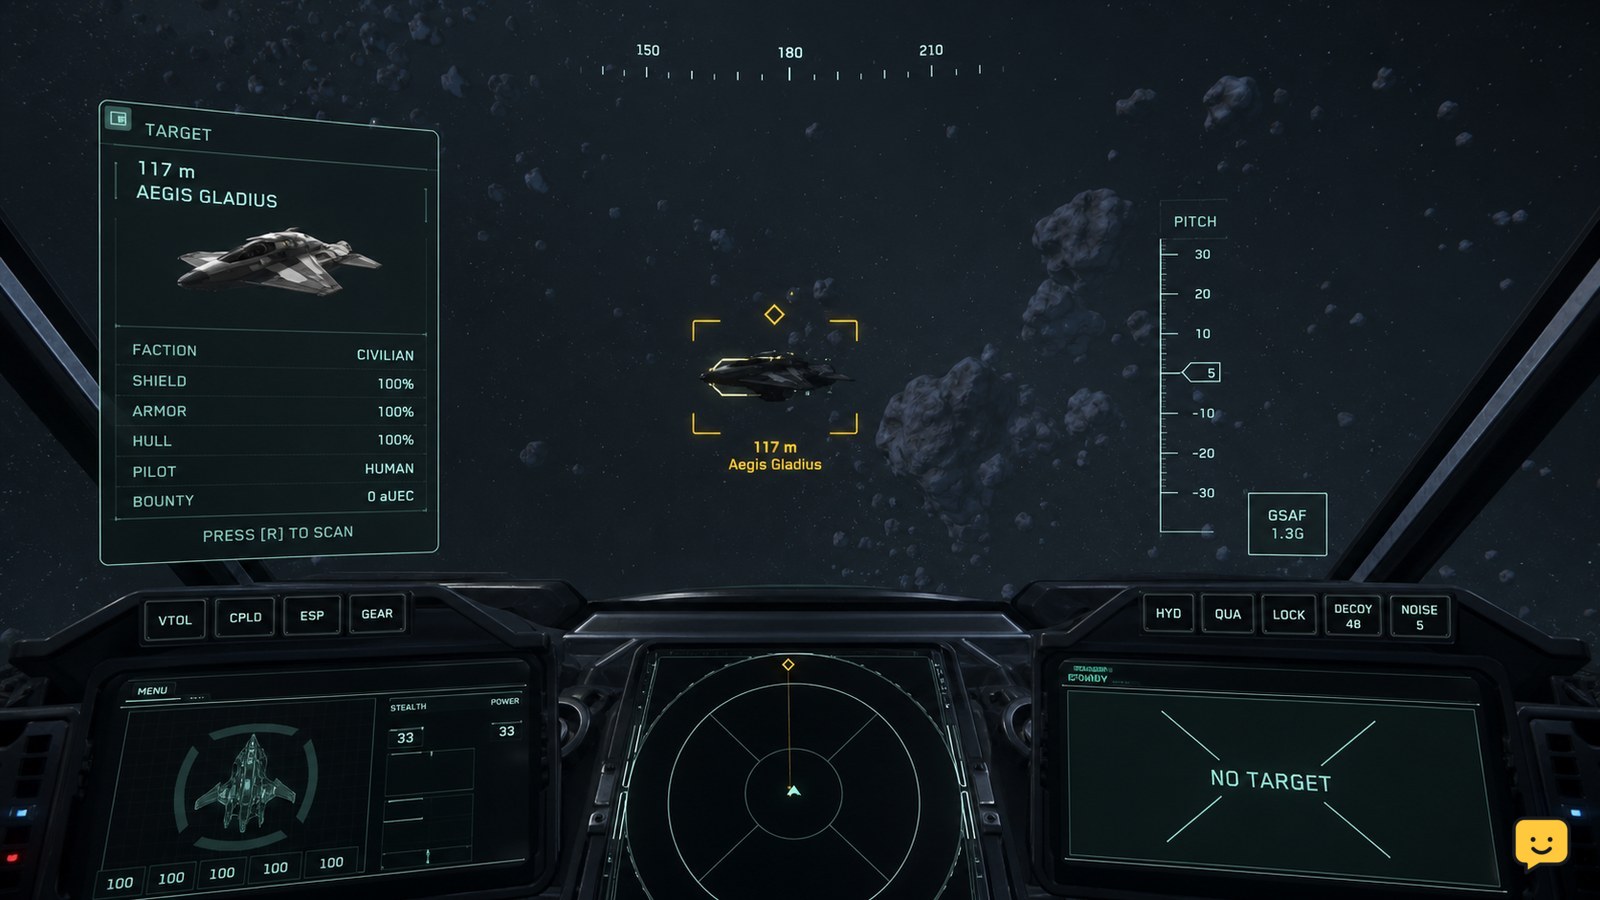
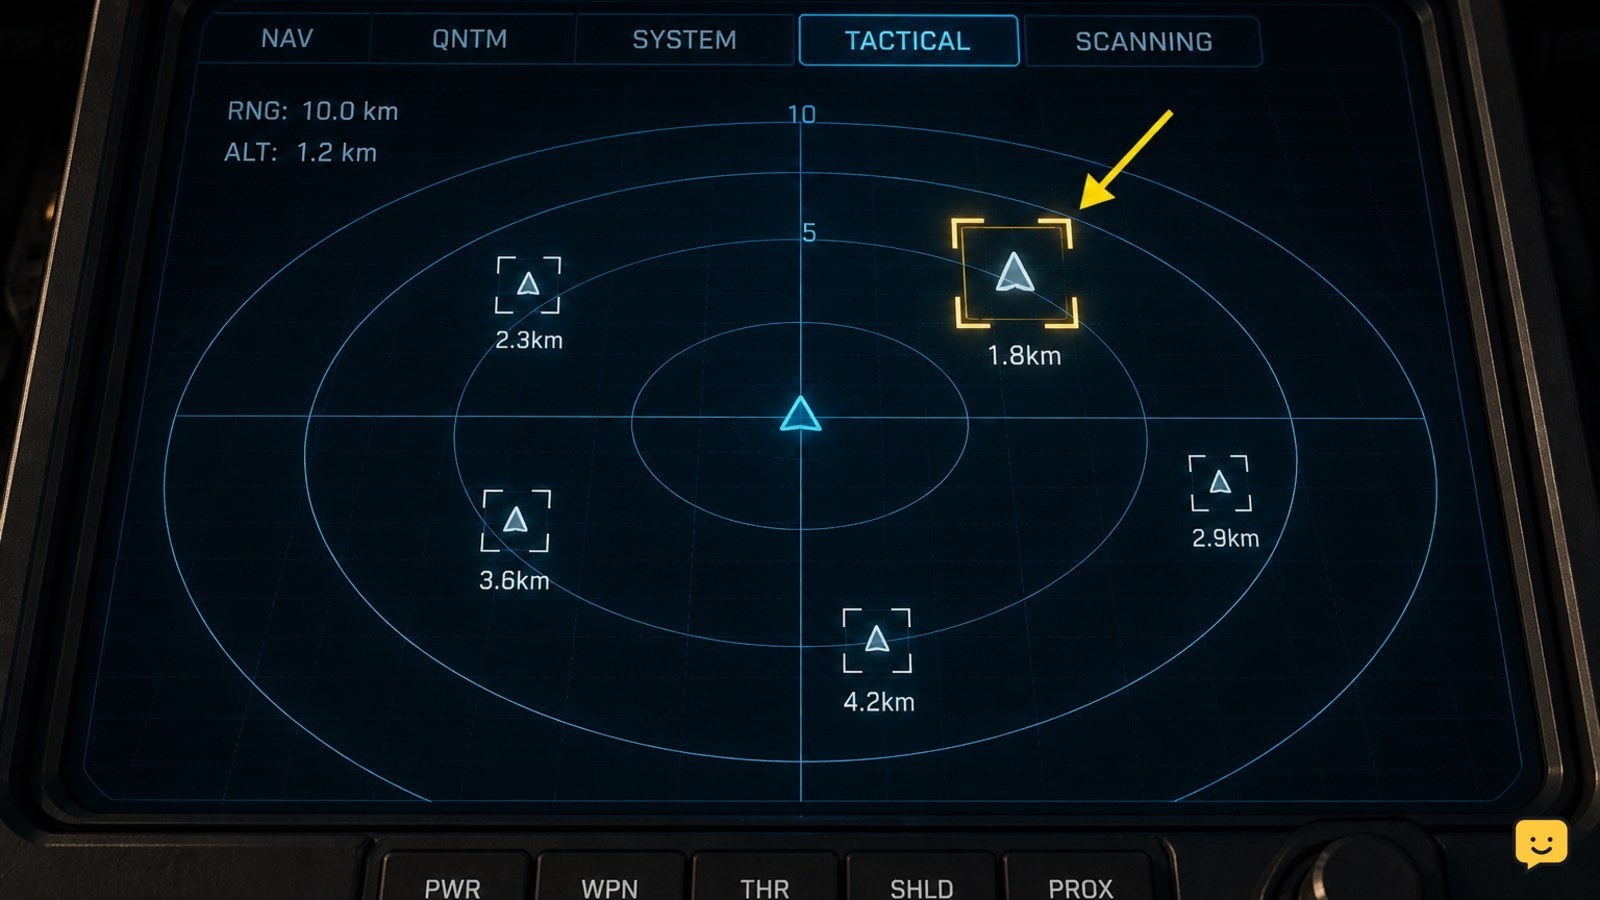
Star Citizen identifies the intended contact only after you select the correct ship rather than scanning an unconfirmed marker. If several contacts are nearby, use the HUD or tactical display to isolate the ship you want. The supplied tactical-display guide describes selecting a ship marker before locking it, which supports using the display to separate one contact from another.
- Compare the contact marker with the ship’s position in space.
- Choose the marker that matches the ship you are facing.
- Use your current targeting or selection control to keep that contact active.
When the wrong ship is selected, the scan may return valid information for a different contact. Reposition your view and select again rather than assuming the first result belongs to the visible ship.
Read the contact result before making a decision
Star Citizen’s scan result is useful when the contact readout updates with the identity, ship, or cargo information that the current interface makes available. Treat those fields as inspection data, not as an automatic threat assessment. A ship can be unidentified, neutral, mission-related, or dangerous regardless of whether its marker is visible.
Read the result while the intended contact remains selected. Compare the displayed information with the ship’s location and movement, then decide whether you need to keep observing, alter course, or leave the area. The cargo-scanning guides supplied for this topic frame scanning as a way to judge whether further engagement is worthwhile, but they do not establish a universal current rule for every contact type.
Verification checkpoint: the selected marker and the information panel should refer to the same ship. If the marker changes but the panel stays blank or refers to another contact, the inspection is incomplete.
Verify that the scan completed instead of showing only a marker
A completed Star Citizen scan produces a contact result that remains tied to the selected ship long enough for you to read it. Verify all three visible states: the intended ship is selected, the readout has changed from an empty or generic state, and the displayed information matches the contact’s position.
- Selected ship: the active marker follows the contact you meant to inspect.
- Updated readout: information appears beyond a basic distance or positional marker.
- Matching contact: the readout does not belong to a nearby second ship.
If one of these checks fails, do not use the result to identify the contact. Re-select the ship and repeat the scan once from a stable heading.
Fix a missing, partial, or incorrect scan result
When Star Citizen does not provide a usable scan result, first distinguish a selection problem from an interface or control problem. A wrong ship highlighted in a crowded area points to contact selection; no response from any nearby ship points to the assigned scan action or an interface fault.
| Observed symptom | Likely cause | Safest next action |
|---|---|---|
| The wrong ship’s information appears | Another contact is selected | Clear or change the selection, aim at the intended ship, and scan again. |
| A marker is visible but no details appear | The scan has not completed | Hold the contact in view and repeat the scan once. |
| No ship responds to the scan action | Missing or changed keybind, or an interface issue | Check the current keybindings, then stop if the action remains unavailable. |
| Information disappears immediately | The contact is no longer selected or has left usable view | Reacquire the contact before attempting another scan. |
If the problem continues after one controlled retry, avoid stacking more changes onto the setup. Record the ship, location, interface state, and exact symptom, then consult current LIVE support or patch documentation. The supplied references do not verify a single universal control layout for the present LIVE build.
Frequently asked questions
Does scanning a ship automatically identify whether it is hostile?
No. Scanning can provide available contact, ship, or cargo information, but it is not a complete threat assessment. Confirm the selected contact, read the result, and use its behavior and your situation before approaching or engaging.
Why can I see a ship but not scan it?
A visible ship may not be the active contact, or the scan action may be unassigned or different from an older guide’s shortcut. Select the correct marker, check your current keybindings, and repeat the scan once from a steady heading.
Can I scan cargo without locking the ship?
The supplied gameplay references discuss scanning ships and cargo, but they do not establish one current LIVE requirement for locking every target. Select the intended contact first and follow the scan result shown by your current interface; do not assume a cargo result is complete if the ship is not clearly selected.
What should I do when several ships overlap on the HUD?
Use the tactical display or contact markers to separate the ships, then select the marker matching the vessel you want to inspect. Reposition your view if necessary. Verify that the information panel changes for that same contact before relying on the result.