In The Isle Evrima, diet is more than keeping your stomach full. Foods contribute nutrient types to the diet display, and filling useful combinations can provide temporary growth or survival benefits. Check the nutrient symbols shown after eating, use accessible foods that improve your active diet, and prioritize safety and water over chasing a perfect combination.
What diet does in Evrima
In The Isle Evrima, your stomach measures how much food you have, while the diet system tracks the nutritional value of what you eat. A full stomach prevents starvation, but it does not automatically mean you have a useful diet bonus.
Food can add one or more nutrient types to your diet display. Building a better mix can improve a part of your dinosaur’s performance for as long as that diet state remains active. The practical beginner goal is simple: stay fed first, then make food choices that improve the diet icons you already have.
This guide is for Evrima. Do not apply Legacy diet advice, menus or food lists to Evrima; the two versions have differed substantially in mechanics and presentation.
Read the diet interface before choosing food
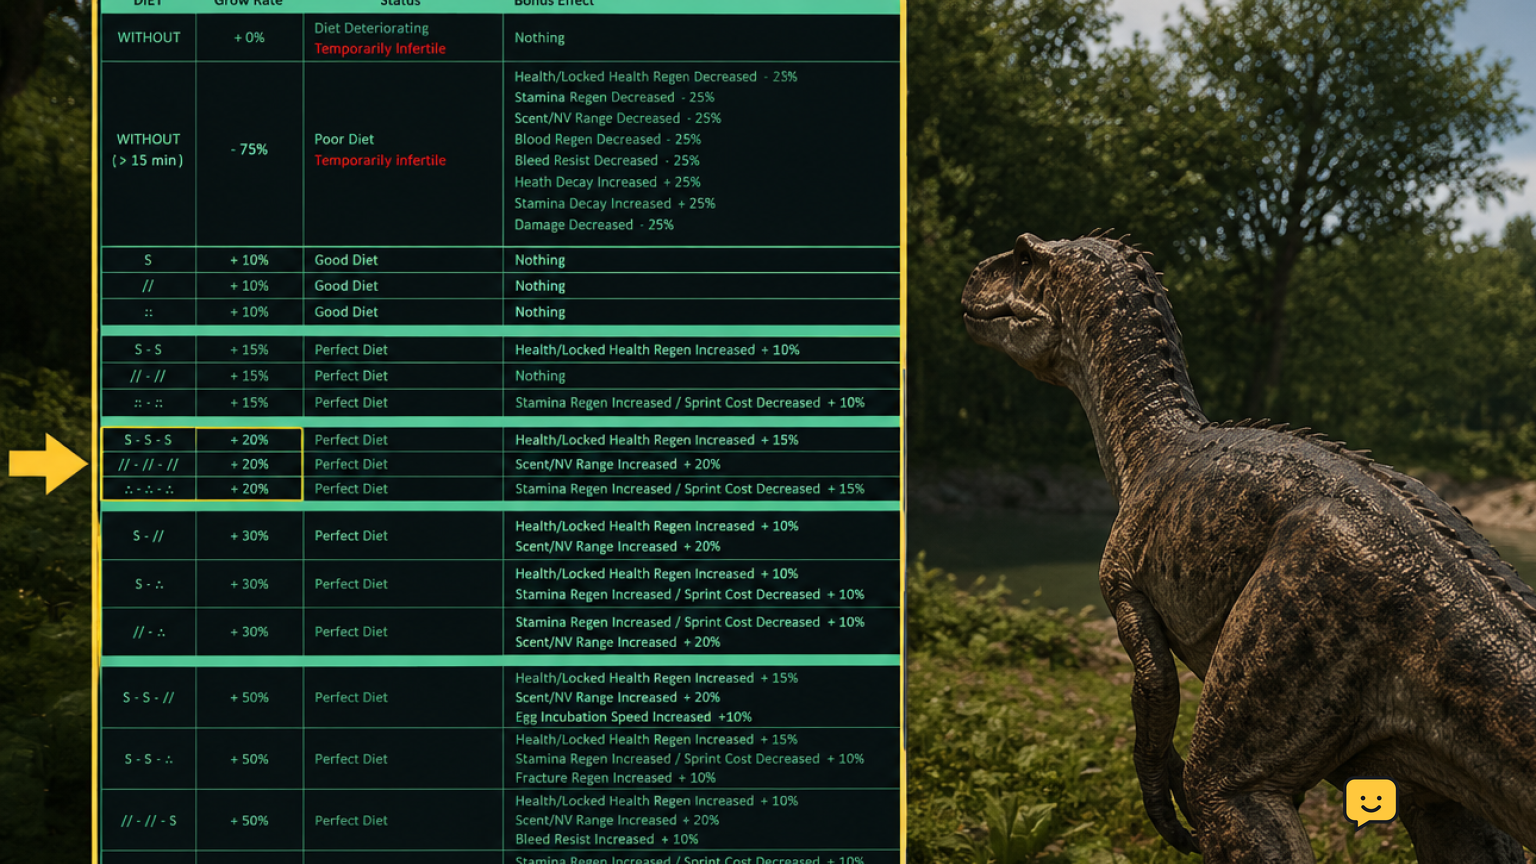
Look at your in-game diet information after eating. The display shows the nutrient symbols currently contributed by your food and the available diet slots or combination state. Treat those symbols as the source of truth, rather than memorising a chart from an older video or community post.
- Eat a safe, available food source.
- Check which nutrient symbol or symbols were added or strengthened.
- Compare the result with the empty or partially filled parts of your diet display.
- Choose your next food based on what would add a missing useful nutrient, if it is safely reachable.
Different species can have different valid foods. Herbivores generally gain diet from compatible plants, while carnivores gain it from suitable prey or carcasses. Young animals may also have practical feeding options that differ from adults, so always verify what your own interface reports.
Think of slots as choices, not a food checklist
A diet slot is best understood as a place where a nutrient contribution can count toward a combination. Repeating the same nutrient may be useful when you want its associated effect, but it can also leave other potential benefits unused. Variety is therefore often valuable, not automatically mandatory.
Do not build your routine around an exhaustive food database. Maps, spawn patterns, species access and game updates can make a fixed list unreliable. Instead, learn three things from foods you encounter regularly: which nutrient symbol they provide, whether your species can obtain them safely, and whether they help your current diet state.
For example, if your display shows one nutrient repeatedly but another useful slot is empty, a different safe food type is usually a better next choice than more of the same food. If the alternative is far away or dangerous, keep eating the safe option and survive.
How diet bonuses work
Diet bonuses come from the nutrient combination currently represented on your display. Community guides commonly describe combinations as supporting areas such as growth, stamina or recovery, but exact effects, icon meanings and values can change between Evrima updates. Read the in-game description or current interface indicator whenever one is available.
A useful way to plan is to decide what matters during your next few minutes of play:
- Growing safely: favour a combination that your current build identifies as helping growth, provided you can maintain it without exposing yourself.
- Travelling or escaping: a stamina-oriented benefit can be more useful than a growth-focused choice.
- Recovering after danger: choose a recovery-related benefit only when food and water are secure.
A bonus is temporary value, not a reason to take a bad fight, cross an exposed area or ignore dehydration. In Evrima, surviving long enough to use a modest diet is better than dying while searching for an ideal one.
A safe beginner routine
- Spawn and secure basics. Find water, cover and a food source your dinosaur can use. Do not begin with a long nutrient hunt.
- Eat enough to stabilise. Get out of immediate starvation pressure before evaluating diet efficiency.
- Inspect the diet result. Note the symbol added by that food and whether it fills, repeats or improves your current diet state.
- Use nearby variety. If a second safe food source provides a missing nutrient, add it. Avoid crossing the map solely to complete a combination.
- Recheck after a major change. Reassess after growth, migration, a move to a new area or a server/build update.
This routine works even when you do not know every food item. It turns the interface into your reference and reduces the chance of following outdated advice.
When a perfect diet is the wrong choice
Do not treat an incomplete diet as failure. A partially useful diet while drinking safely, hiding from predators or staying with a group is often the correct decision. Food competition, scent trails and exposed travel can create more danger than a bonus can offset.
For herbivores, migration or patrol areas may influence where suitable plants are easiest to find. For carnivores, the prey that completes a nutrient may be too risky to hunt alone. In either case, switch from optimisation to survival when the route is contested, your resources are low or you have no safe escape path.
Verification: after changing food sources, confirm that the expected nutrient appears on your diet display and that any claimed benefit is actually active. If the screen does not match a guide, trust the game screen and use a current community reference for your build.
If your diet is not changing
First, confirm that you ate a food your current species can use and that you consumed enough for the game to register it. Then inspect the diet display again rather than assuming the food has a different nutrient value.
- The symbol repeated: you likely ate another source of the same nutrient. Look for a safe alternative rather than continuing to repeat it.
- No useful option is nearby: keep your existing food and water stable; wait, relocate carefully or coordinate with a group.
- A guide shows different icons or effects: it may describe Legacy, an older Evrima build or a different species. Stop using it as a live reference.
- The interface appears broken after an update: leave risky situations, document what you see, and check current official or active community reports before assuming a mechanic has been removed.
Frequently asked questions
Do I need every diet slot filled in The Isle Evrima?
No. You do not need every slot filled to survive or grow. A complete or well-chosen combination can be helpful, but safe food, water and avoiding danger take priority over completing a diet.
How do I know which nutrient a food gives in Evrima?
Check your diet display after eating it. The nutrient symbol that appears or increases is the most reliable indication for your current Evrima build and dinosaur, especially when older food charts disagree.
Should I eat the same food repeatedly in Evrima?
Sometimes, but not by default. Repeating a food can maintain the nutrient it provides, while a different nearby food may fill a missing slot or create a more useful active combination.
Are The Isle Legacy diet guides accurate for Evrima?
No. Legacy and Evrima use different systems and have changed independently. Use guidance specifically labelled for Evrima, then verify its symbols and effects against the interface on your current server.
What should I do if I cannot find the food for a diet bonus?
Keep yourself fed with the safest compatible food you can reach. Do not risk starvation, dehydration or a predator encounter for one missing nutrient unless the route is genuinely safe and practical.
Planning your next route? Use the The Isle Evrima map to find key locations before you move.